How to Apply Eyeshadow Based on Your Eye Shape
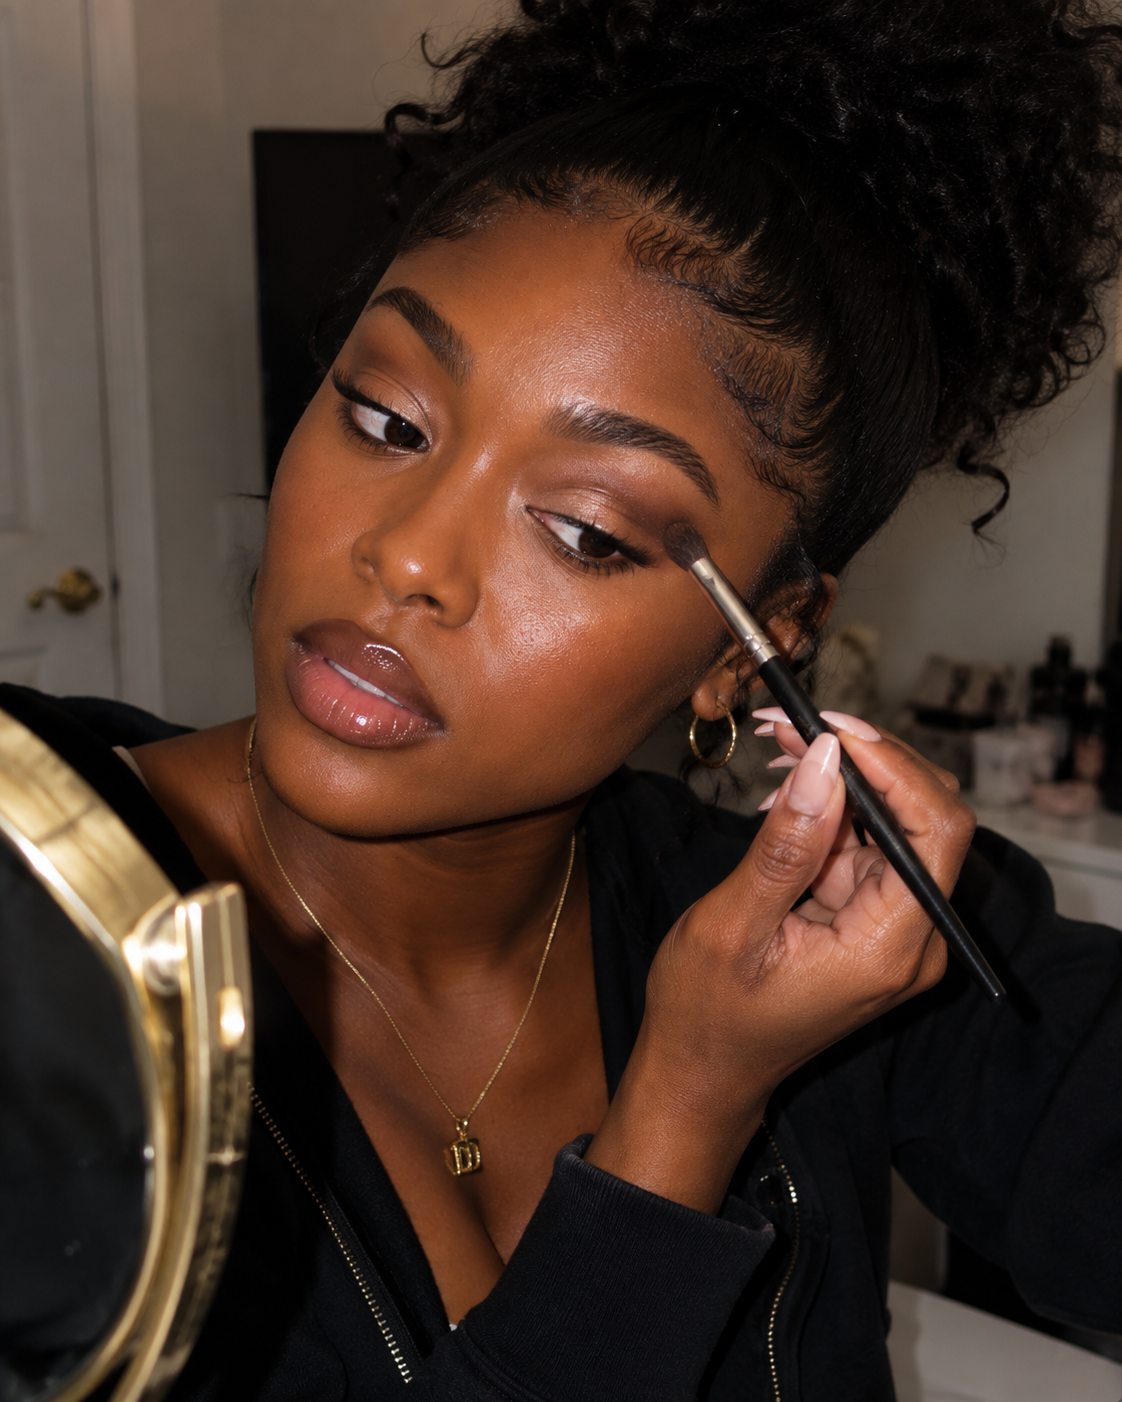
Photo Credit:@autumlovedaily
The first time I followed a three-color eyeshadow tutorial exactly, I was offended by the result. The creator had a beautiful open lid and a crisp crease. I had carefully placed the same shades in the same order, opened my eyes—and most of the work disappeared. What remained looked less “soft smoky eye” and more “I got dressed in a moving car.”
The problem was not a lack of blending talent. It was placement. Eyeshadow tutorials often teach a map as if every eye has the same amount of visible lid, the same crease depth and the same angle at the outer corner. Real faces do not work that way.
Eye-shape guidance is not a list of rules about what you are “allowed” to wear. Think of it as learning where color remains visible when your eyes are open. Once you know that, you can decide whether you want to lift, elongate, round, brighten or simply make a shimmer shade show up before lunch.
Start Here: The Three-Zone Method
No matter your eye shape, most everyday looks can be built with three placements:
Light: the area you want to bring forward, often the mobile lid or inner corner.
Mid-tone: the soft transition that creates shape without looking like a stripe.
Depth: the shade that adds definition, often at the lash line, outer corner or above the natural crease.
Keep your eye open and look straight into the mirror before you place the mid-tone and depth shade. That single habit fixes half of the “where did my eyeshadow go?” problem.
How to Tell What Eye Shape You Have
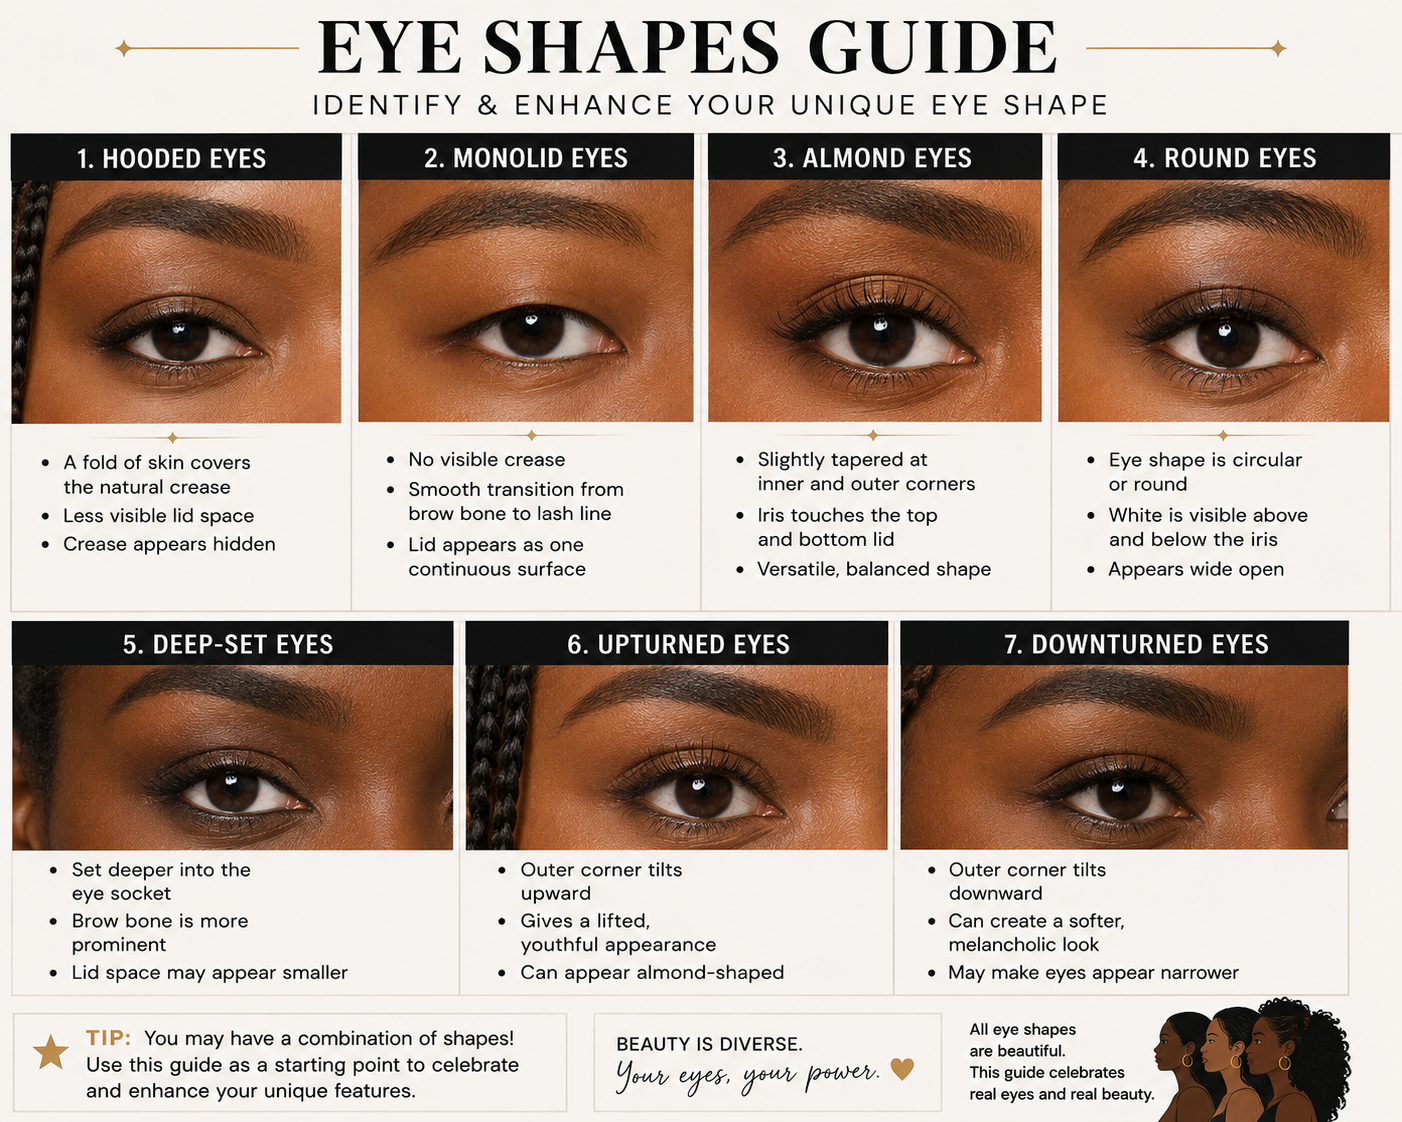
You may have more than one feature. An eye can be almond and hooded, round and deep-set, or upturned and close-set. Use these descriptions as coordinates, not personality types.
Hooded eyes: a fold of skin covers part of the crease when the eyes are open.
Monolids: there is little or no visible crease dividing the lid and brow area.
Almond eyes: the iris is slightly covered at the top and bottom, with tapered inner and outer corners.
Round eyes: more of the white of the eye is visible around the iris, especially below it.
Deep-set eyes: the eyes sit farther back beneath a more prominent brow bone.
Protruding or prominent eyes: the mobile lid appears especially visible or rounded from the side.
Upturned eyes: the outer corner sits higher than the inner corner.
Downturned eyes: the outer corner sits slightly lower than the inner corner.
Close-set eyes: the space between the eyes is narrower than approximately one eye width.
Wide-set eyes: the space between the eyes is wider than approximately one eye width.
How to Apply Eyeshadow for Hooded Eyes
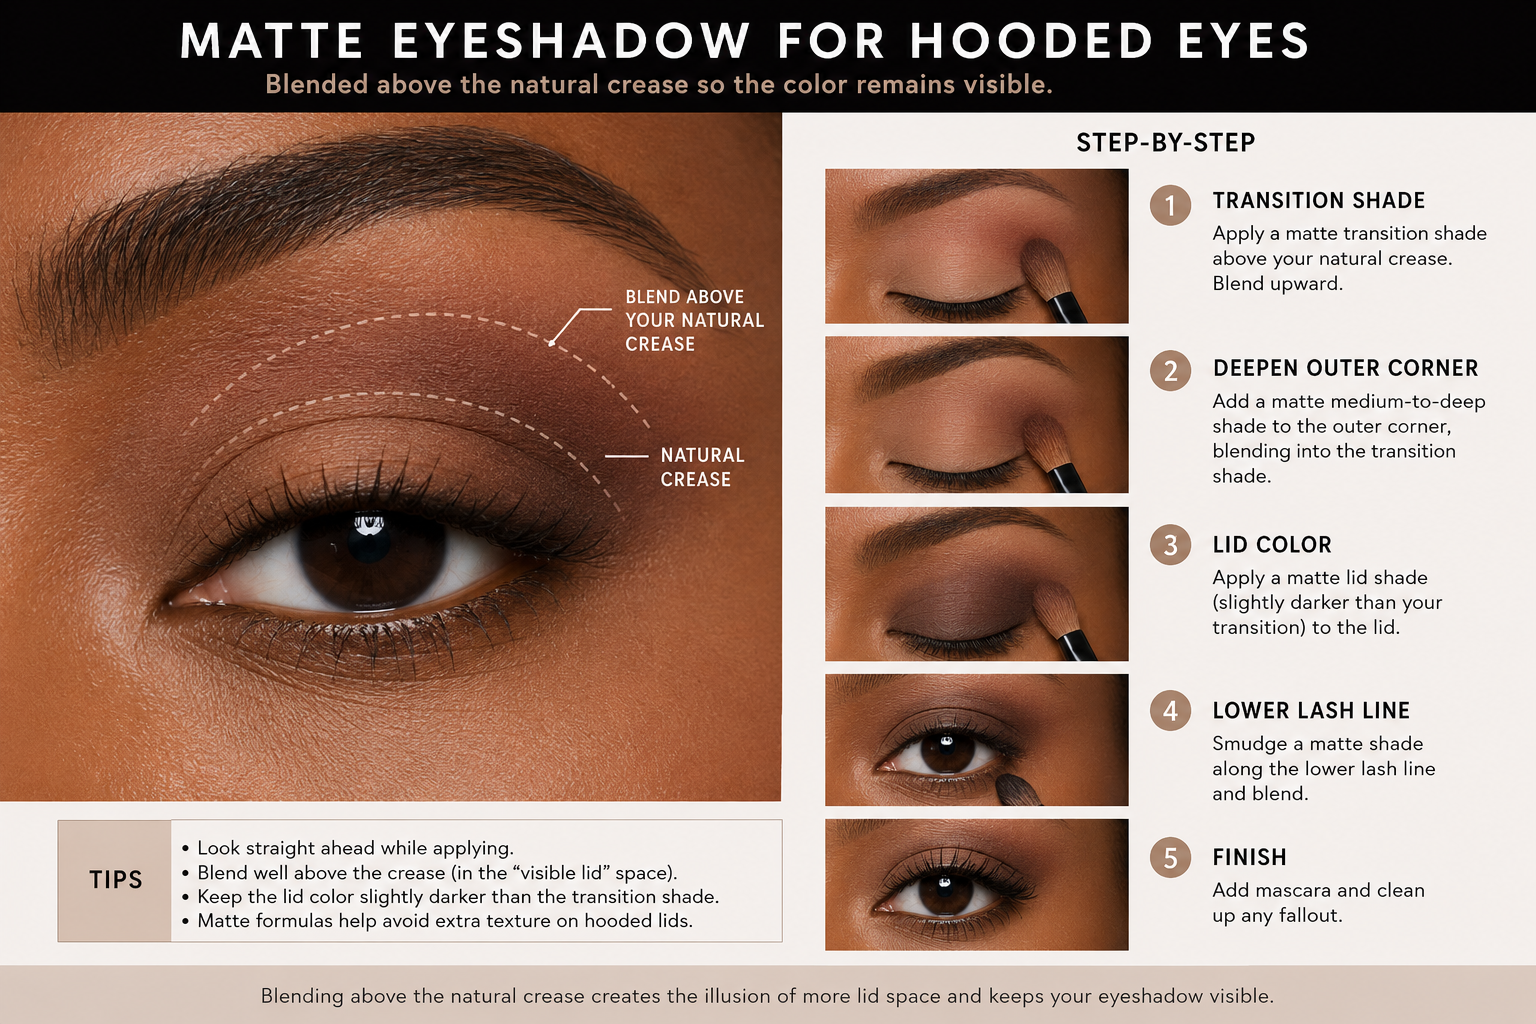
The goal is not to “fix” a hood. It is to place the design where it can be seen.
The method
Prime a larger area than you think you need, from lash line to just above the fold.
With your eye open, place a matte mid-tone slightly above the natural crease. Blend upward in small motions, not down onto the lid.
Keep the deepest shade close to the outer lash line and angle it slightly upward.
Put shimmer on the part of the lid that remains visible when you look straight ahead. A smaller brush gives better control.
Use thin liner at the inner and middle lash line so it does not consume limited lid space.
The common mistake is finishing the entire look with the eye closed. Open it between every step. If your outer shadow folds or transfers, place the edge with your eye open, then blend with the eye half-closed.
Best shortcut: one matte taupe buffed above the fold, a satin shade pressed onto the center lid and mascara concentrated at the outer lashes.
How to Apply Eyeshadow for Monolids
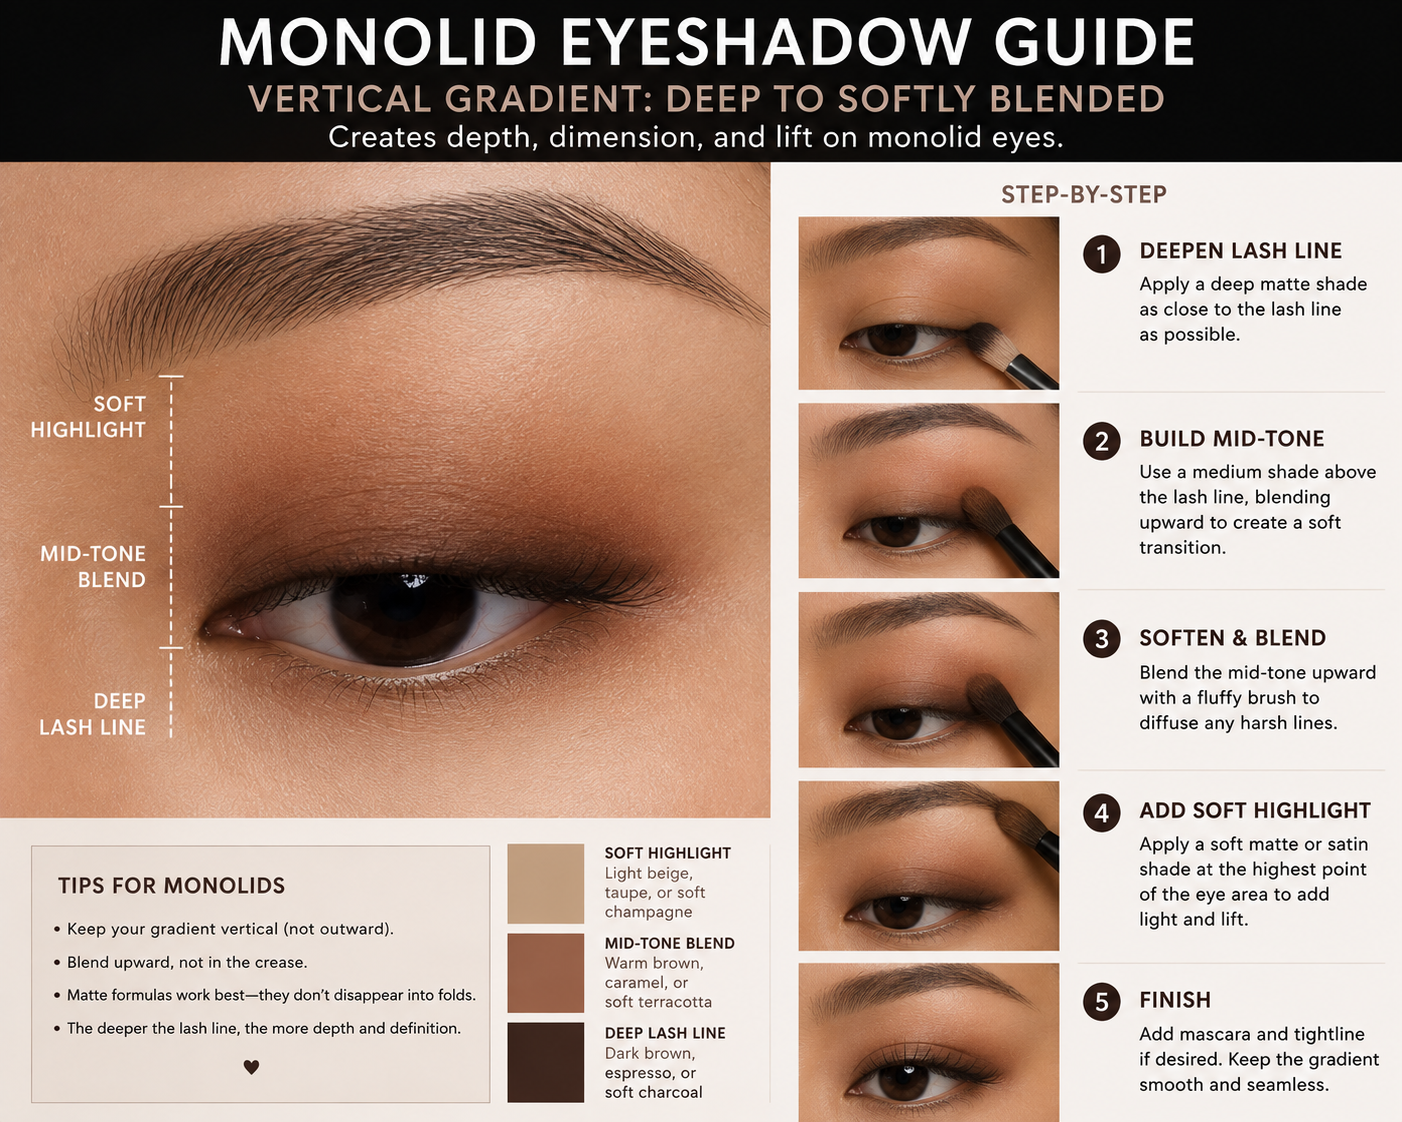
A monolid does not need a fake crease. It gives you a beautiful uninterrupted surface for gradients, spotlight shimmer and graphic color.
The method
Prime well, especially near the lash line where transfer can happen.
Build color vertically: deepest at the lashes, softer through the middle and diffused toward the brow.
Look straight ahead to decide how high the color needs to travel before it is visible.
Try a spotlight eye by placing depth on the inner and outer thirds and shimmer in the center.
Smudge liner into the upper lashes instead of drawing a thick band across the lid.
The common mistake is copying a cut crease designed around a deep socket line. A soft gradient usually creates more dimension and is easier to repeat.
Best shortcut: a cream shadow stick across the lid, blended upward with a small synthetic brush, plus a brighter shimmer tapped at the center.
How to Apply Eyeshadow for Almond Eyes
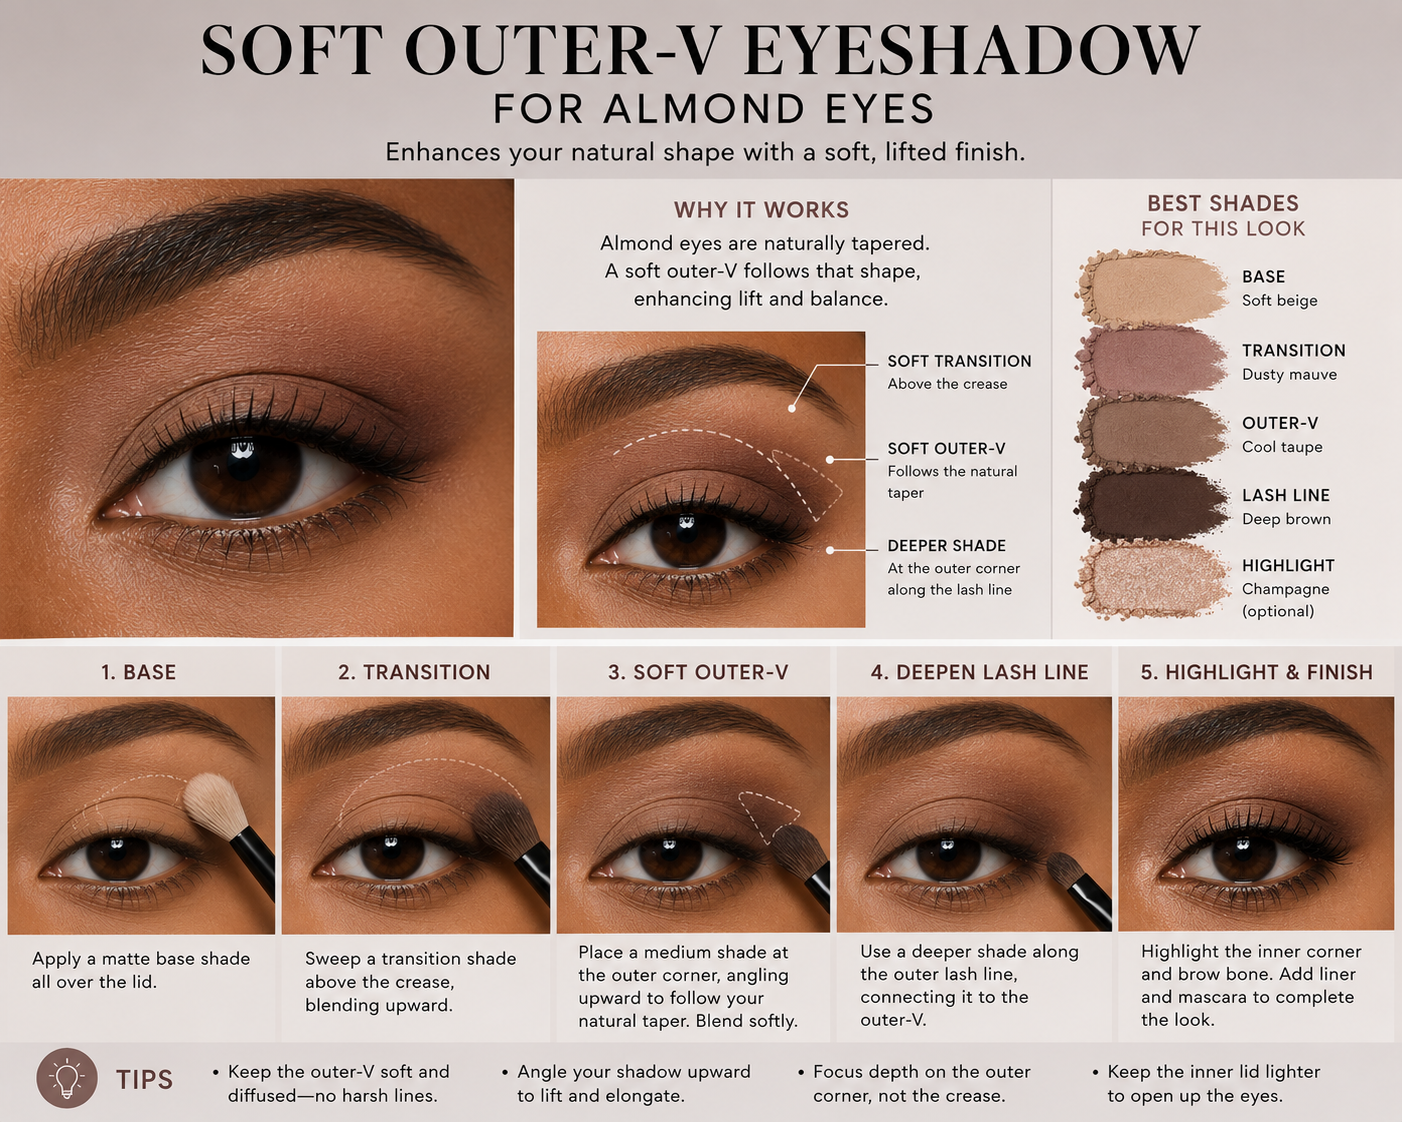
Almond eyes work with many placements, so the decision is less about correction and more about the mood you want.
The method
Sweep a mid-tone through the crease, following the natural curve.
Place depth in a sideways V at the outer corner, keeping the lower edge aligned with the lower lash line.
Blend slightly outward to emphasize the tapered shape.
Place shimmer across the lid or just in the center for dimension.
Keep lower-lash shadow soft and connected to the outer corner.
For a rounder, doll-like effect, concentrate shimmer in the center and keep the outer edge compact. For elongation, extend the outer shadow and liner horizontally.
Best shortcut: matte brown through the crease, deeper brown at the outer third and champagne shimmer on the inner two-thirds.
How to Apply Eyeshadow for Round Eyes
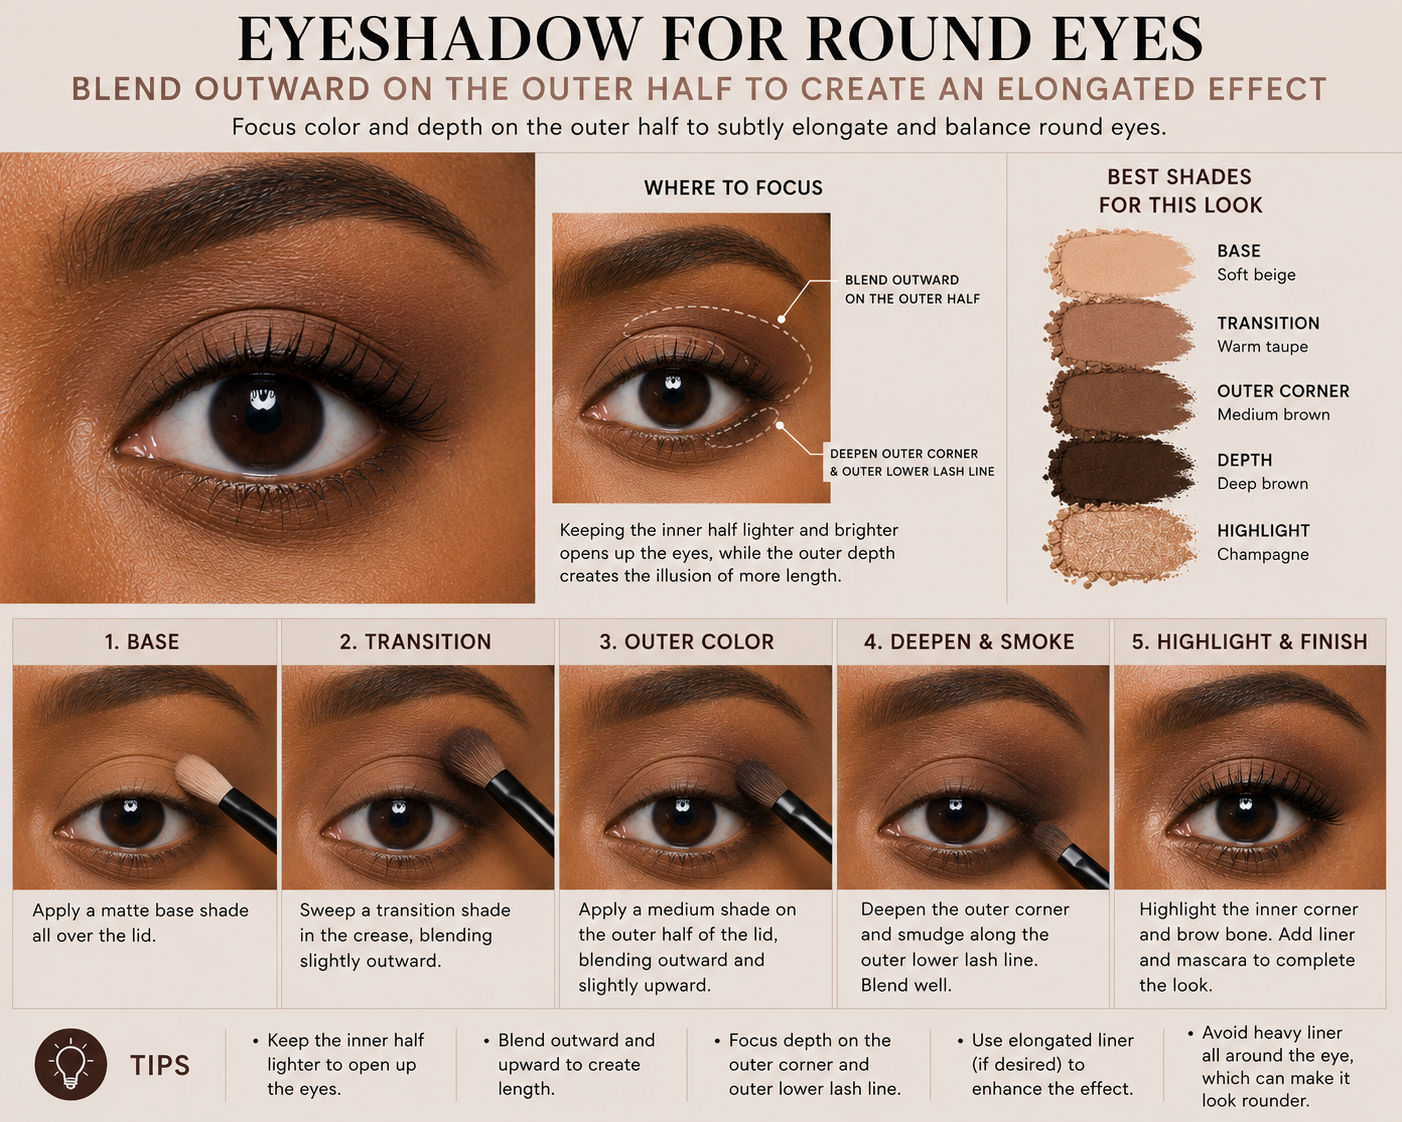
Round eyes already have openness. You can celebrate it with a centered halo or create an elongated effect with horizontal placement.
For an elongated look
Keep the inner lid light.
Blend the mid-tone from the center of the crease outward rather than tracing a full semicircle.
Pull the deepest shade toward the temple in a soft wing.
Smudge the lower lash line only on the outer half.
Direct liner outward instead of sharply upward.
The common mistake is circling the entire eye with dark shadow, which can make the makeup feel heavy. Leave breathing room at the inner corner.
Best shortcut: soft brown on the outer half, a clean inner corner and mascara focused on the outer lashes.
How to Apply Eyeshadow for Deep-Set Eyes
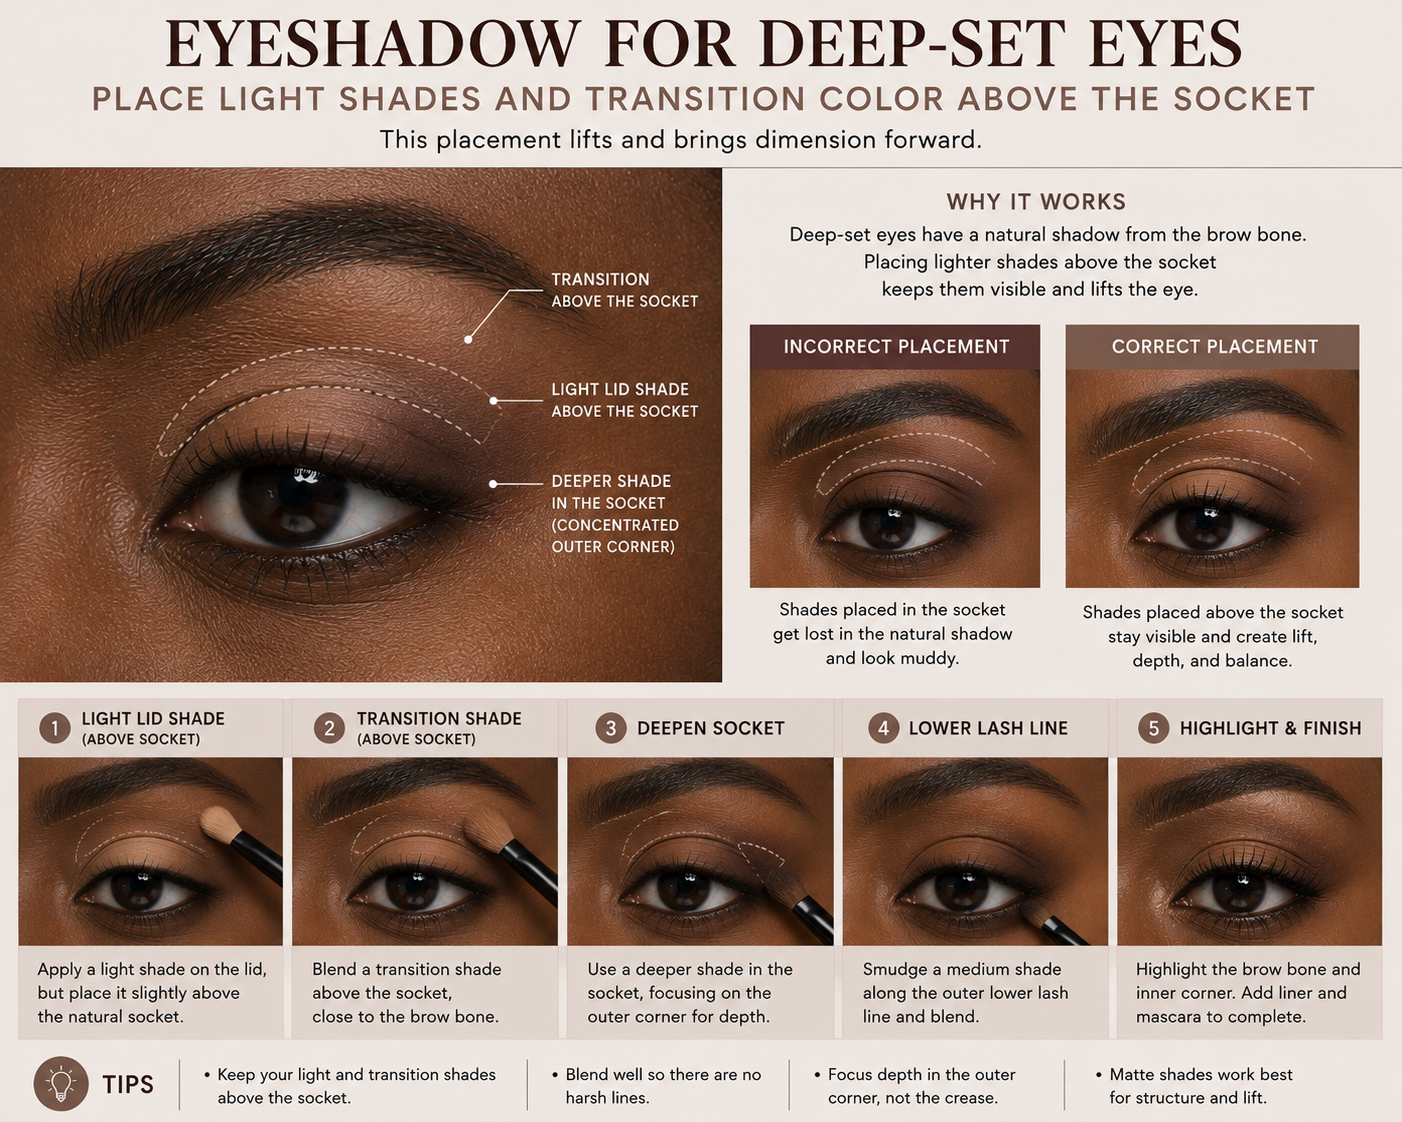
Because the socket naturally creates shadow, too much dark color in the crease can make the eyes recede further.
The method
Use a light matte or satin shade across the mobile lid.
Place the transition shade slightly above the deepest part of the socket, where it is visible.
Keep the darkest color close to the upper lash line and outer corner.
Avoid taking very dark shadow all the way through the inner crease for an everyday look.
Brighten the inner third if the brow bone casts a strong natural shadow.
Best shortcut: a luminous neutral lid, softly defined lash line and a mid-tone blended above—not buried inside the crease.
How to Apply Eyeshadow for Prominent Eyes
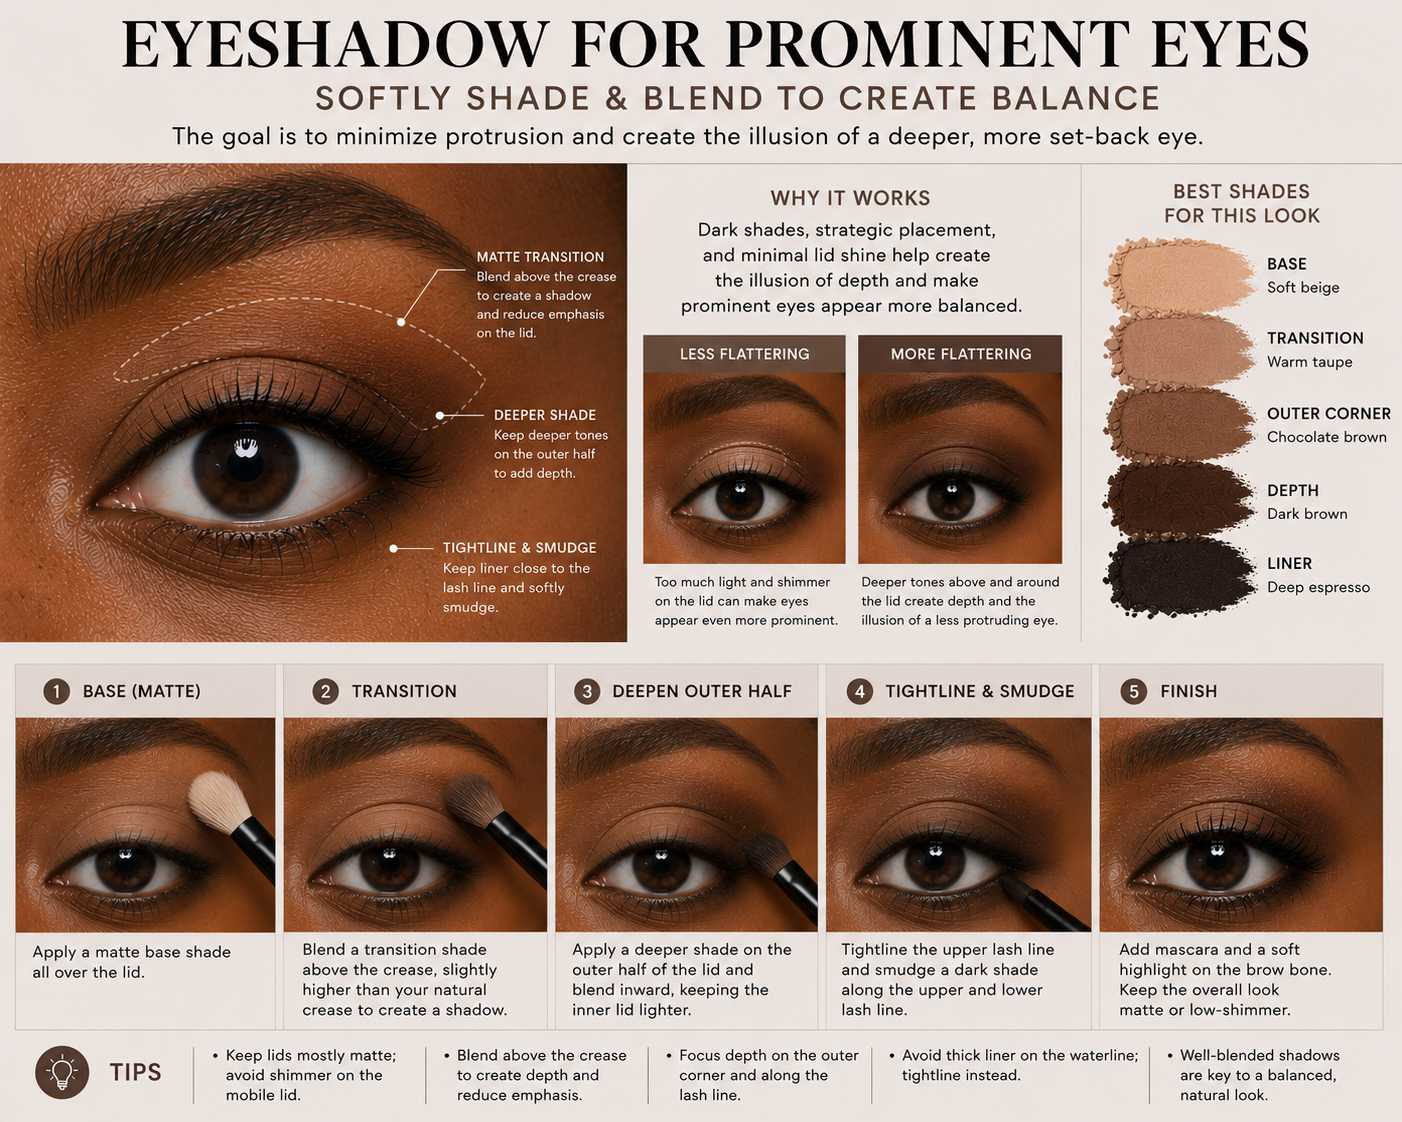
Prominent eyes offer generous lid space. Matte and satin textures can add definition without increasing shine everywhere.
The method
Place a mid-tone across the lid rather than only in the crease.
Use the deepest shade along the lash line and outer third.
Blend edges upward without adding a very pale shimmer over the entire surface.
Try a smoky liner or tightline to anchor the look.
If you love shimmer, concentrate it on the center or inner third.
Best shortcut: satin taupe over the lid, chocolate smudged at the lashes and a clean matte transition at the edge.
How to Apply Eyeshadow for Upturned Eyes
Upturned eyes naturally lift at the outer corner. Follow that line for a feline look or soften it when you want more balance.
To emphasize the lift
Blend the outer shadow toward the tail of the brow and keep the lower-lash color strongest at the outer third.
To create a softer balance
Place shimmer at the center of the lid and keep the lower outer corner lighter. Use mascara evenly rather than adding the longest lashes only at the edge.
Best shortcut: a soft wing of shadow plus a tiny inner-corner highlight.
How to Apply Eyeshadow for Downturned Eyes
Downturned eyes have a gentle slope at the outer corner. The easiest lifting technique is to place the outer shape while looking forward.
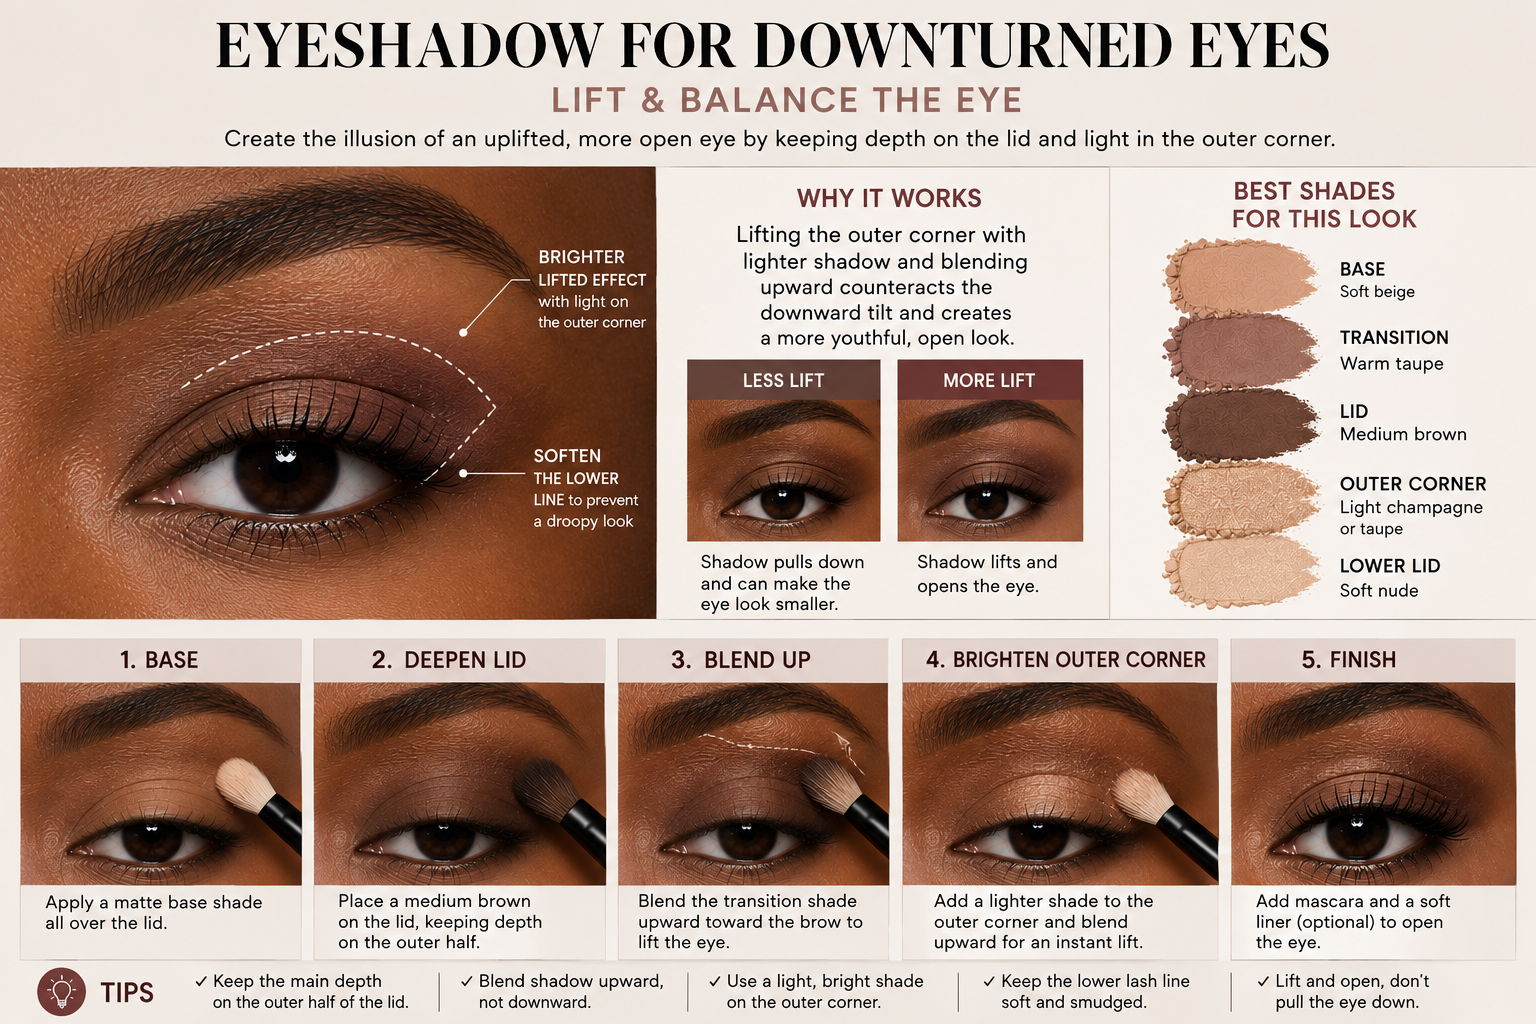
The method
Stop dark shadow just before the lowest point of the outer corner.
Blend depth diagonally toward the temple, following an imaginary line from the lower lash line to the brow tail.
Keep lower-lash shadow light and limited to the outer third.
Angle liner upward before it reaches the natural downturn.
Add mascara to the center and upper outer lashes, not the lowest outer lashes.
Best shortcut: a lifted outer-corner shadow, bare lower waterline and curled lashes.
Adjusting Eyeshadow for Close-Set Eyes
Place your brightest shade at the inner corner and keep the deepest shade on the outer third. Begin liner around the middle of the lash line instead of taking a thick line all the way into the tear duct. The purpose is not to redraw your face; it is simply to keep visual weight away from the center.
Adjusting Eyeshadow for Wide-Set Eyes
Carry the transition shade a little farther toward the inner crease and avoid an extremely bright inner-corner highlight if you want a more centered effect. A softly defined inner upper lash line can also balance the space. You can still wear an outer wing—just keep the look connected through the crease.
The Beginner Eye-Shadow Kit You Actually Need
A matte mid-tone close to your natural shadow color
A deeper brown, plum or charcoal for definition
One satin or shimmer you genuinely enjoy wearing
A small blending brush for controlled placement
A flat or fingertip-friendly brush for lid color
Eye primer if your shadow creases or disappears
Cotton swabs and micellar water for cleaning an outer edge
You do not need a 35-pan palette to learn placement. Three shades that show up on your skin tone are more useful than twenty near-duplicates.
Five Mistakes That Make Eyeshadow Harder
1.Holding the mirror too low
Looking down can hide the crease and change the outer angle. Keep the mirror near eye level when placing the shape.
2.Starting with the darkest shade
Build depth gradually. It is easier to add more than to erase a black cloud from the outer corner.
3.Using one large fluffy brush for everything
A large brush diffuses beautifully but cannot place color precisely on limited lid space. Start small; use the fluffy brush only for the final edge.
4.Blending until every shade becomes one color
Blend the borders between shades, not the entire design into beige. Pause after a few strokes and look straight ahead.
5.Treating both eyes as identical
Most faces are asymmetrical. Place the visible edge on each eye while both are open rather than forcing them to match with the lids closed.
The Best Everyday Formula for Almost Every Eye Shape
Prime. Sweep a mid-tone where it remains visible with your eyes open. Press a satin shade onto the lid. Smudge the deepest shade into the outer upper lashes. Curl lashes and add mascara. That is a complete look.
Once you can repeat that formula, experiment with color, liner and shimmer. Technique should make makeup more fun, not turn your face into homework.
✦ Creator images used for editorial purposes only. All rights belong to their respective creators. We always link and give credit.
✦ Check Out Our Men's Site
Trending on MensOutfitsDaily